Increment your VM storage size in VBox
The reason of this tutorial is because I was playing with a Virtual Machine and I overfill the hardisk space.
To resize the storage, first you need de-attach the hardisk from your VM and close VBOX.
Later, you need convert your .vmdk to a .vdi file with the following command:
vboxmanage clonehd ./machine.vmdk clone.vdi --format vdi
VBoxManage: error: Cannot register the hard disk 'machine.vmdk' {4e55fd9e-f496-4cbf-9610-ad2f8c6b8634} because a hard disk 'machine.vmdk' with UUID {4e55fd9e-f496-4cbf-9610-ad2f8c6b8634} already exists
VBoxManage: error: Details: code NS_ERROR_INVALID_ARG (0x80070057), component VirtualBoxWrap, interface IVirtualBox, callee nsISupports
VBoxManage: error: Context: "OpenMedium(Bstr(pszFilenameOrUuid).raw(), enmDevType, enmAccessMode, fForceNewUuidOnOpen, pMedium.asOutParam())" at line 178 of file VBoxManageDisk.cpp
If you get this error, you must change the UUID from your VM with the following command:
vboxmanage internalcommands sethduuid ./machine.vmdk
UUID changed to: b2bcd6a2-7b47-4afe-be84-1cc32e3b4a0a
Come back to the previous step and increment your disk size with the following command:
vboxmanage clonehd ./machine.vmdk clone.vdi --format vdi
0%...10%...20%...30%...40%...50%...60%...70%...80%...90%...100%
Clone medium created in format 'vdi'. UUID: 4851e29d-1fbf-43ce-b076-662a80d8d2f7
vboxmanage modifyhd ./clone.vdi --resize 80000
0%...10%...20%...30%...40%...50%...60%...70%...80%...90%...100%
BEFORE


To resize the storage, first you need de-attach the hardisk from your VM and close VBOX.
Later, you need convert your .vmdk to a .vdi file with the following command:
vboxmanage clonehd ./machine.vmdk clone.vdi --format vdi
VBoxManage: error: Cannot register the hard disk 'machine.vmdk' {4e55fd9e-f496-4cbf-9610-ad2f8c6b8634} because a hard disk 'machine.vmdk' with UUID {4e55fd9e-f496-4cbf-9610-ad2f8c6b8634} already exists
VBoxManage: error: Details: code NS_ERROR_INVALID_ARG (0x80070057), component VirtualBoxWrap, interface IVirtualBox, callee nsISupports
VBoxManage: error: Context: "OpenMedium(Bstr(pszFilenameOrUuid).raw(), enmDevType, enmAccessMode, fForceNewUuidOnOpen, pMedium.asOutParam())" at line 178 of file VBoxManageDisk.cpp
If you get this error, you must change the UUID from your VM with the following command:
vboxmanage internalcommands sethduuid ./machine.vmdk
UUID changed to: b2bcd6a2-7b47-4afe-be84-1cc32e3b4a0a
Come back to the previous step and increment your disk size with the following command:
vboxmanage clonehd ./machine.vmdk clone.vdi --format vdi
0%...10%...20%...30%...40%...50%...60%...70%...80%...90%...100%
Clone medium created in format 'vdi'. UUID: 4851e29d-1fbf-43ce-b076-662a80d8d2f7
vboxmanage modifyhd ./clone.vdi --resize 80000
0%...10%...20%...30%...40%...50%...60%...70%...80%...90%...100%
Now, you have a new disk with 80GB of storage.
Come back to VBOX and attach your new disk .vdi on your VM.
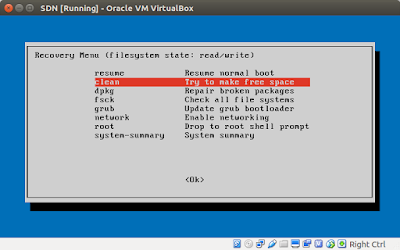
If at the moment to run the VM, after grub, the screen comes black, a possible reason is that you don't have necessary space on disk yet. To solve it, you need clean space before.
Restart your VM and choose recovery mode in grub. After, choose clean option.

Later, resume to restart on normal mode.
It's common can't run your OS if you don't have free space.
But wait! We have the same storage capacity yet.
We need run our VM with gparted live CD or any live CD with an application to resize our disk.
You can download gparted live CD from here or via terminal with the following command:
Now, mount your live CD in VBox and resize the partition

AFTER

Now, if run your VM and check your drive size with "df -h" you will see your previous size!
To extend the logical volume into the resized partition you need the logical volume's location (the path of your disk retrieved from "df -h"). Now, write the following command:
sudo lvextend -l +100%FREE /dev/mapper/ubuntu--vg-root
sudo resize2fs -p /dev/mapper/ubuntu--vg-root
where /dev/mapper/ubuntu--vg-root is the logical volume's location retrieved from "df -h"
Now, you have a resized disk.
Enjoy it!
Reference: http://www.stevejenkins.com/blog/2014/07/resize-a-fedora-or-windows-dynamic-guest-virtual-disk-vdi-in-virtualbox-in-3-easy-steps/


Comments
Post a Comment