Posts

Showing posts from 2018

ERROR: LoadError: UndefVarError: writedlm not defined

I got this issue when I migrated my code from Julia 0.6.1 to Julia 1.0.1. To solve it you must add to the beginning of your code the following line: using DelimitedFiles Enjoy it!

How to install pgadmin4 in Ubuntu 18.10 throught apt

If you want to install pgadmin4, as the official site said, probably you can't do it if you have Ubuntu Cosmic. You need to add bionic repository, because in cosmic only pgadmin3 is available. Also, you need to specify if you are using 64 bits architecture. sudo apt-get install curl ca-certificates curl https://www.postgresql.org/media/keys/ACCC4CF8.asc | sudo apt-key add - sudo sh -c 'echo "ddeb [arch=amd64] http://apt.postgresql.org/pub/repos/apt/ bionic-pgdg main" > /etc/apt/sources.list.d/pgdg.list' sudo apt update sudo apt install pgadmin4 Enjoy it! Official site:  https://wiki.postgresql.org/wiki/Apt

How to install Visual Code from apt in Ubuntu

To get the lastest software versions, is a good idea get it from repositories to upgrade them. To add Visual Code to apt execute the following lines: curl https://packages.microsoft.com/keys/microsoft.asc | gpg --dearmor > microsoft.gpg sudo install -o root -g root -m 644 microsoft.gpg /etc/apt/trusted.gpg.d/ sudo sh -c 'echo "deb [arch=amd64] https://packages.microsoft.com/repos/vscode stable main" > /etc/apt/sources.list.d/vscode.list' sudo apt-get install apt-transport-https sudo apt-get update sudo apt-get install code  Enjoy it!

How to use aria2c with chrome as download manager in Linux

In the following site, you can found the source code and the link to the extension for google chrome: https://github.com/robbielj/chrome-aria2-integration After installed aria2, you must run the following sentence: aria2c -s10 -x10 --enable-rpc --rpc-listen-all=true --rpc-allow-origin-all=true Now, you could choose download your files with aria2c from google chrome. Enjoy it!

How to disable power button in Ubuntu 18.10

Image
If you have an Asus notebook, probably you hate the new power button location (right top corner). To disable it and avoid accidently turn off your computer you can do the following steps: Step1: Install dconf-editor sudo apt install dconf-editor Step2: Run dconf-editor and go to org.gnome.settings-daemon.plugins.power.power-button-action Step3: Choose the value 'nothing' Enjoy it! Also, you can try directly with these commands: gsettings list-recursively org.gnome.settings-daemon.plugins.power gsettings set org.gnome.settings-daemon.plugins.power button-power 'nothing'

How to choose a background image for grub2

If you want a background image for grub2, first you need to change the colors and resize it (the larger the image, the longer it takes to start grub2). convert -resize 640x480 -colors 256 image.jpg new_image.png Now, move the image to grub folder sudo mv new_image.png /boot/grub And tell to grub file where  is the path to read the background image: sudo vim /etc/default/grub add the following line: GRUB_BACKGROUND=/boot/grub/new_image.png Now, update your grub sudo update-grub Enjoy it!

How to run Gephi in Ubuntu

If you try to run Gephi in your linux, probably you will see the following issue: Illegal reflective access by org.netbeans.ProxyURLStreamHandlerFactory This appears when you are using openjdk9 or newer. To fix it, you must install openjdk8-jdk and choose it for java and javac sudo apt-get install openjdk-8-jdk with the following command you can see your java installed versions: sudo update-java-alternatives --list Now, choose version 8 for each one: sudo update-alternatives --config javac sudo update-alternatives --config java Enjoy it!

How to install teamviewer from apt in Ubuntu 18.10

We need to add it to apt sources list: cd /tmp && wget https://download.teamviewer.com/download/linux/signature/TeamViewer2017.asc sudo apt-key add TeamViewer2017.asc sudo sh -c 'echo "deb http://linux.teamviewer.com/deb stable main" >> /etc/apt/sources.list.d/teamviewer.list' sudo sh -c 'echo "deb http://linux.teamviewer.com/deb preview main" >> /etc/apt/sources.list.d/teamviewer.list' sudo apt update sudo apt install teamviewer Enjoy it!

How to install Sublime Text in Ubuntu 18.10

First, we going to install sublime text from the repositories. To do that, we need to add it to the repositories list: wget -qO - https://download.sublimetext.com/sublimehq-pub.gpg | sudo apt-key add - echo "deb https://download.sublimetext.com/ apt/stable/" | sudo tee /etc/apt/sources.list.d/sublime-text.list sudo apt update && sudo apt install sublime-text Now, just register it with a valid license! ----- BEGIN LICENSE ----- sgbteam Single User License EA7E-1153259 8891CBB9 F1513E4F 1A3405C1 A865D53F 115F202E 7B91AB2D 0D2A40ED 352B269B 76E84F0B CD69BFC7 59F2DFEF E267328F 215652A3 E88F9D8F 4C38E3BA 5B2DAAE4 969624E7 DC9CD4D5 717FB40C 1B9738CF 20B3C4F1 E917B5B3 87C38D9C ACCE7DD8 5F7EF854 86B9743C FADC04AA FB0DA5C0 F913BE58 42FEA319 F954EFDD AE881E0B ------ END LICENSE ------ For 3.2.2 version:  ----- BEGIN LICENSE ----- TwitterInc 200 User License EA7E-890007 1D77F72E 390CDD93 4DCBA022 FAF60790 61AA12C0 A37081C5 D0316412 4584D136 94D7F7D4 95BC8C1C

How to install shutter on Ubuntu 18.10

Shutter is a software to take screenshots to your desktop. Since 18.10 is not more in repositories, but you can add it with the following command: sudo add-apt-repository ppa:ubuntuhandbook1/shutter Now, just update your repositories and install it. Enjoy it!

How to run microPython in ESP-WROOM-32 module

Image
If you have an ESP-WROOM-32 module, you can use Zerynth Studio to upload your microPython code. You can download it from  https://downloads.zerynth.com/zerynth.tar.xz See the following video to do it Probably you could have the following issue after click the uplink icon: [error] Can't open serial: /dev/ttyUSB0 To fix this error it is enough to change the permissions of access to the terminal: sudo chmod 666 /dev/ttyUSB0 Another issue is when you try to upload the code and you get the following error: [error] No answer to probe To fix it, you must virtualize your device. After to do that, you could upload your code and get the following output: info] Probe sent [info] Got header: r2.1.2 SxTxJKbAQFaaRCayjua5sw esp32_devkitc 42504c29f107 ZERYNTH [info] Found VM SxTxJKbAQFaaRCayjua5sw for esp32_devkitc [info] Handshake [info]     symbols: 3 [info]     membase  @3FFC24A4 [info]     romstart @40150000 [info]     flash    @00080000 [info] Erasing flash [i

Get raster values for points in a map with QGIS

Image
To get raster values you need to install "Point sampling Tool" from plugins list. Next, you must create a layer with points over the pixels from your raster layer. If you click on "Point sampling Tool" icon or from Plugins/Analyses option you would get raster values from each vectorial points. As you see in the image, each point is in a different raster color, therefore each one has an own value. Enjoy!

How to install Qgis3.2 + Grass7 + PGAdmin4 + Postgres11 + Postgis2.5 in Ubuntu Bionic

To start the installation, you must to add the following lines to your /etc/apt/sources.list file: # qgis deb http://qgis.org/debian bionic main deb-src http://qgis.org/debian bionic main # pgadmin4 deb http://apt.postgresql.org/pub/repos/apt/ xenial-pgdg main 11 Now, you need to get the repositories keys with the following sentences: # qgis gpg --keyserver keyserver.ubuntu.com --recv CAEB3DC3BDF7FB45 gpg --export --armor CAEB3DC3BDF7FB45 | sudo apt-key add - # pgadmin4 wget --quiet -O - https://www.postgresql.org/media/keys/ACCC4CF8.asc | sudo apt-key add - Now, proceed with installation: sudo apt-get update sudo apt-get upgrade sudo apt-get install postgresql postgresql-contrib postgresql-11-postgis-2.5-scripts pgadmin4 qgis python-qgis qgis-plugin-grass -y To configure postgres, we procced to create a database with a postgres user: sudo -u postgres createdb testing psql -d testing -c "create extension postgis" Probably you will get the followin

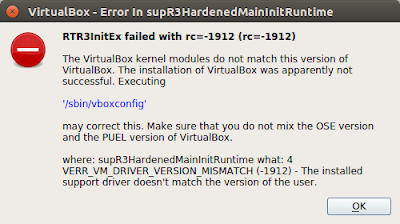
Fix VirtualBox - RTR3InitEx failed with rc=-1912 (rc=-1912)

Image
If you try to install a new VirtualBox version, maybe you would have this issue: In my case, I had VirtualBox 5.0 and I also installed version 5.2 Now, the only version that exists is PUEL (Oracle version). For that reason, you need to remove choose between OSE (older version) or PUEL (new version). In my case I choose OSE. To fix it, just run in your terminal these commands: dpkg -P virtualbox-dkms sudo apt-get install virtualbox-dkms virtualbox-guest-additions-iso Enjoy!

How to upgrade to Postgis 2.4.4

To upgrade postgis, you need download the tarball and compile it: wget https://download.osgeo.org/postgis/source/postgis-2.4.4.tar.gz tar xvzf postgis-2.4.4.tar.gz cd postgis-2.4.4 ./configure configure: WARNING:  --------- GEOS VERSION WARNING ------------  configure: WARNING:   You are building against GEOS 3.5.1  configure: WARNING:   To take advantage of all the features of  configure: WARNING:   this PostGIS version requires GEOS 3.7.0 or higher which is not out yet. configure: WARNING:   To take advantage of most of the features of this PostGIS configure: WARNING:   we recommend GEOS 3.6 or higher configure: WARNING:   You can download the latest versions from  configure: WARNING:   http://trac.osgeo.org/geos  We need to install the lastest geos version cd .. wget http://download.osgeo.org/geos/geos-3.7.0rc1.tar.bz2 tar xjvf geos-3.7.0rc1.tar.bz2 cd geos-3.7.0rc1 ./configure make -j4; sudo make install Now, come back to postgis to finish the configuration

AttributeError: module 'lib' has no attribute 'SSL_ST_INIT'

I wanted to upgrade pip but I couldn't by the following error: sudo pip install --upgrade pip  Traceback (most recent call last):   File "/usr/local/bin/pip", line 7, in <module>     from pip._internal import main   File "/usr/local/lib/python3.5/dist-packages/pip/_internal/__init__.py", line 42, in <module>     from pip._internal import cmdoptions   File "/usr/local/lib/python3.5/dist-packages/pip/_internal/cmdoptions.py", line 16, in <module>     from pip._internal.index import (   File "/usr/local/lib/python3.5/dist-packages/pip/_internal/index.py", line 14, in <module>     from pip._vendor import html5lib, requests, six   File "/usr/local/lib/python3.5/dist-packages/pip/_vendor/requests/__init__.py", line 97, in <module>     from pip._vendor.urllib3.contrib import pyopenssl   File "/usr/local/lib/python3.5/dist-packages/pip/_vendor/urllib3/contrib/pyopenssl.py",

How to insert code in an interactive python console througth Visual Studio Code

Image
After run your code, to edit or add new instructions is not neccesary run all your code again. A good idea is to run a partial or section code. To do it, you must run your code as interactive mode. You have 3 ways to do it with vscode: 1.- Task You can create a task to run python in interactive mode. Press Ctrl+Shift+P and type: Configure Task Paste the following code: { "version" : "2.0.0" , "tasks" : [ { "label" : "Run File" , "command" : "python3 -i ${file}" , "type" : "shell" , "group" : { "kind" : "build" , "isDefault" : true }, "presentation" : { "reveal" : "always" , "focus" : true } } This task is

How to decrypt SSL/TLS connections with wireshark

Image
If you try to understand your SSL/TLS connections generated by your web browser like chrome, firefox or others, you must create a new variable in your .bashrc file as follows: export SSLKEYLOGFILE="$HOME/sslkeylog.log" To tells Wireshark where is this file, yo need specified the path in: Edit / Preferences / Protocols / SSL / (Pre)-Master-Secret log filename. Now, when you will call your browser from the terminal, it will generate  sslkeylog.log  with all private keys for each site, and wireshark would decrypt SSL/TLS traffic. Here is an example: Enjoy!

How to fix VirtualBox error when you try to import an ova file

If you download an ova file to import it to Virtualbox, maybe you will see the following message: Failed to import appliance filename.ova. Seeking within the archive failed (VERR_TAR_UNEXPECTED_EOS). Result Code: VBOX_E_IPRT_ERROR (0x80BB0005) Component: ApplianceWrap Interface: IAppliance {8398f026-4add-4474-5bc3-2f9f2140b23e} If you do it the same throught VBoxManage you will get: # VBoxManage import filename.ova  Progress state: VBOX_E_IPRT_ERROR VBoxManage: error: Appliance import failed VBoxManage: error: Seeking within the archive failed (VERR_TAR_UNEXPECTED_EOS) VBoxManage: error: Details: code VBOX_E_IPRT_ERROR (0x80bb0005), component ApplianceWrap, interface IAppliance VBoxManage: error: Context: "RTEXITCODE handleImportAppliance(HandlerArg*)" at line 877 of file VBoxManageAppliance.cpp To fix it, you must extract ova content and compress again as follows: tar xvf filename.ova tar cvf newfilename.ova filename.ovf filename.vmdk Also, you can i

How to convert from LaTeX to HTML file

If you have a .tex file and you want to convert it to a .html file you can use LaTeXML. # git clone https://github.com/brucemiller/LaTeXML.git # sudo apt-get install libimage-size-perl libimage-magick-perl # cd LaTeXML # perl Makefile.PL Warning: prerequisite Parse::RecDescent 0 not found. Warning: prerequisite Text::Unidecode 0 not found. Warning: prerequisite Image::Size 0 not found. Warning: prerequisite XML::LibXSLT 1.58 not found. To install these perl dependencies, you must use the following commands: # sudo cpan z Parse::RecDescent # sudo cpan z Text::Unidecode # sudo cpan z Image::Size # sudo cpan z XML::LibXSLT looking for -lxslt... no libxslt not found Try setting LIBS and INC values on the command line Or get libxslt and libxml2 from   http://www.libxml.org/ If you install via RPMs, make sure you also install the -devel RPMs, as this is where the headers (.h files) are. No 'Makefile' created  SHLOMIF/XML-LibXSLT-1.96.tar.gz   /usr/bin/perl

How to fix Low disk space on "boot"

A common issue is when /boot partition is full. You receive the following message: "Low disk space on "boot". The volume "boot" has only 0 bytes disk space remaining" To fix it, you must delete old kernels. First, you must list all of them and I recomend remove the oldest and keep the last two newest (if you have problems with the last, you can use the other). To list all of them, use this command: # dpkg -l linux-image-\* | grep ^ii | awk '{print $2}' linux-image-4.13.0-36-generic linux-image-4.13.0-37-generic linux-image-4.13.0-38-generic linux-image-4.13.0-39-generic linux-image-4.13.0-41-generic Now, you must purge the oldest kernels with the following command: # sudo apt-get purge linux-image-4.13.0-{36,37,38}-generic You need to change the values according to the values you have. Finally, update grub # sudo update-grub Enjoy it!

How to convert kml to shape format throught ogr2ogr

You can create your kml file online with scribblemaps  and download it to your computer. If you create lines and markers in the same file, you will get this error: ogr2ogr -f "ESRI Shapefile" file.shp file.kml -skipfailures Warning 6: Normalized/laundered field name: 'description' to 'descriptio' Warning 6: Field timestamp create as date field, though DateTime requested. Warning 6: Field begin create as date field, though DateTime requested. Warning 6: Field end create as date field, though DateTime requested. Warning 6: Normalized/laundered field name: 'altitudeMode' to 'altitudeMo' ERROR 1: Attempt to write non-point (LINESTRING) geometry to point shapefile. ERROR 1: Attempt to write non-point (LINESTRING) geometry to point shapefile. ERROR 1: Attempt to write non-point (LINESTRING) geometry to point shapefile. To avoid it, you must create separated files for points, linestring or polygon as: ogr2ogr point.shp point.kml -skipfa

How to find the shortest path from an Internet Zoo topology file throught Postgis/pgrouting

Image
First, you need to download a topology from Internet zoo. I will use Napnet as example: wget  http://www.topology-zoo.org/files/Napnet.graphml Now, we need to convert graphgml to sql (to load from postgres). To do it, you can use simplekml library for python or pykml. It's important use geographic coordinates without altitude value and only write edges in the kml file. After, you can follow this post  to convert from kml to sql. To begin, first we need to create a database and create a password (usually is postgres) for postgres user: sudo -u postgres createdb testing sudo -u postgres psql   postgres=# \password postgres Enter new password:  Enter it again:  postgres=# \q Now, load the sql query: psql -U postgres -d testing -q -f "Napnet.sql" psql: FATAL:  Peer authentication failed for user "postgres" To avoid this issue, you can run it throught this way: psql 'host=localhost port=5432 dbname=testing user=postgres' -q -f &quo

How to install Qgis 3.0.x in Ubuntu 18.04

Image
If you try to install from repositories, you will install version 2.18 To install the lastest version, you can download it from git, but first you need to install dependencies. If you have Ubuntu 18.04 you need the following packages: sudo apt-get install bison ca-certificates ccache cmake cmake-curses-gui dh-python doxygen expect flex gdal-bin git graphviz grass-dev libexpat1-dev libfcgi-dev libgdal-dev libgeos-dev libgsl-dev libosgearth-dev libpq-dev libproj-dev libqca-qt5-2-dev libqca-qt5-2-plugins libqt5opengl5-dev libqt5scintilla2-dev libqt5sql5-sqlite libqt5svg5-dev libqt5webkit5-dev libqt5xmlpatterns5-dev libqwt-qt5-dev libspatialindex-dev libspatialite-dev libsqlite3-dev libsqlite3-mod-spatialite libzip-dev lighttpd locales ninja-build pkg-config poppler-utils pyqt5-dev pyqt5-dev-tools pyqt5.qsci-dev python3-all-dev python3-dateutil python3-dev python3-future python3-gdal python3-httplib2 python3-jinja2 python3-markupsafe python3-mock python3-nose2 python3-owslib python3-pl

How to run Cplex throught Julia

Image
In my last post I talk about  how to run Gurobi throught Julia . To do a benchmarking, now I going to explain how to run Cplex. First, you need to register here to download cplex chmod +x cplex_studio128.linux-x86-64.bin   ./cplex_studio128.linux-x86-64.bin  By default, cplex use /opt/ibm/ILOG/CPLEX_Studio128 to install it After, you need to add the binaries to your PATH or create symbolic links to the executables: sudo ln -s /opt/ibm/ILOG/CPLEX_Studio128/cplex/bin/x86-64_linux/cplex /usr/bin/cplex sudo ln -s /opt/ibm/ILOG/CPLEX_Studio128/cplex/bin/x86-64_linux/cplexamp /usr/bin/cplexamp cd  /opt/ibm/ILOG/CPLEX_Studio128 /cplex/python/3.6/x86-64_linux sudo python3 setup.py install Now, add Cplex package to Julia: julia> Pkg.add("CPLEX") INFO: Cloning cache of CPLEX from https://github.com/JuliaOpt/CPLEX.jl.git INFO: Installing CPLEX v0.3.2 INFO: Building CPLEX ================================[ ERROR: CPLEX ]================================ Loa

How to run Gurobi throught Julia

To install Julia, we can download it from github git clone  https://github.com/JuliaLang/julia.git cd julia sudo apt-get install build-essential libatomic1 python gfortran perl wget m4 cmake pkg-config make -j8 make install cd julia-* cd bin pwd Now, export the working directory to your .bashrc file export PATH="$(pwd)/julia:$PATH" Run julia and add JuMP (Julia for Mathematical Programming): Pkg.add("JuMP") WARNING: Base.Pkg is deprecated, run `using Pkg` instead Newer versions must use Pkg first as following: using Pkg Pkg.add("JuMP") Other option is install it from the tarball file: wget https://github.com/JuliaLang/julia/releases/download/v0.6.2/julia-0.6.2-full.tar.gz tar xzvf julia-0.6.2-full.tar.gz cd julia-0.6.2 make -j8 make install cd julia-* cd bin pwd Export to the bashrc file again and install the package: Pkg.add("JuMP") Pkg.add("Gurobi") Pkg.update() Maybe you can have issues to lo

How to install gurobi in Ubuntu 18.04 out/inside an academic domain

Image
To install gurobi, you can do it throught anaconda or tarball, secondly we need configure PATHS and  register the licence. Anaconda option to install: wget https://repo.continuum.io/archive/Anaconda3-5.1.0-Linux-x86_64.sh chmod +x Anaconda3-5.1.0-Linux-x86_64.sh  ./Anaconda3-5.1.0-Linux-x86_64.sh  conda update -n base conda conda update -n base conda conda config --add channels http://conda.anaconda.org/gurobi conda install gurobi If you want to uninstall anaconda, you can do it the following: conda install anaconda-clean anaconda-clean rm -rf ~/anaconda3 Tarball option to install: First, you need to create an account in Gurobi here  and after proceed to download it: wget http://packages.gurobi.com/7.5/gurobi7.5.2_linux64.tar.gz tar xzvf gurobi7.5.2_linux64.tar.gz cd gurobi752/linux64 sudo python setup.py install Configure gurobi: We need to add the PATH to our environment. By default, in linux, we use .bashrc Edit ~/.bashrc and add the following lines:

How to upgrade pgrouting to lastest version (2.6)

If you installed pgrouting from synaptic, probably you have pgrouting 2.4.2. To upgrade to the last version, download it from github: wget https://github.com/pgRouting/pgrouting/releases/download/v2.6.0/pgrouting-2.6.0.tar.gz tar xzvf pgrouting-2.6.0.tar.gz cd pgrouting-2.6.0 mkdir build cd build cmake .. -- POSTGRESQL_PG_CONFIG is /usr/bin/pg_config -- POSTGRESQL_EXECUTABLE is /usr/lib/postgresql/9.6/bin/postgres -- POSTGRESQL_VERSION_STRING in FindPostgreSQL.cmake is PostgreSQL 9.6.8 -- PostgreSQL not found. CMake Error at CMakeLists.txt:294 (message):    Please check your PostgreSQL installation. To solve it, you need to install postgres developer sudo apt-get install postgresql-server-dev-9.6 cmake .. Could not find the following Boost libraries:           boost_thread           boost_system -- CGAL not found. CMake Error at CMakeLists.txt:351 (message):    Please check your CGAL installation, or set correct path to CGAL_INCLUDE_DIR and CGAL_LIBRARIES.

Load kml geojson osm shp files in Postgis

In my last post I talk how to convert from kml to GeoJson Now, I want to load this file in a Spatial and Geographic Objects for PostgreSQL (postgis) I read in many sites that you can convert from osm 2 postgres, then I will try to convert to osm file with geojsontoosm. # sudo  npm install -g geojsontoosm npm ERR! enoent ENOENT: no such file or directory, open '/tmp/npm-15537-43d2f472/unpack-edff7974/package.json' npm ERR! enoent ENOENT: no such file or directory, open '/tmp/npm-15537-43d2f472/unpack-edff7974/package.json' npm ERR! enoent This is most likely not a problem with npm itself npm ERR! enoent and is related to npm not being able to find a file. npm ERR! enoent  To install, I used the git files: # git clone https://github.com/tyrasd/geojsontoosm.git # cd geojsontoosm # ./geojsontoosm  module.js:471     throw err;     ^ Error: Cannot find module 'jxon' Error: Cannot find module 'optimist' Error: Cannot find module 'geo

How to fix npm

I tried to install togeojson, but I got the following error: npm install -g @mapbox/togeojson  npm ERR! Linux 4.4.0-116-generic npm ERR! argv "/usr/local/bin/node" "/usr/local/bin/npm" "install" "-g" "@mapbox/togeojson" npm ERR! node v8.0.0-pre npm ERR! npm  v3.5.3 npm ERR! code MODULE_NOT_FOUND npm ERR! Cannot find module 'internal/fs' npm ERR!  npm ERR! If you need help, you may report this error at: npm ERR!     <https://github.com/npm/npm/issues> npm ERR! Please include the following file with any support request: npm ERR!     /home/nboettcher/Downloads/togeojson/npm-debug.log Other common error is: npm ERR! Cannot find module 'ansi' To solve them, you must reinstall nodejs and npm with the following sentences: sudo apt-get remove nodejs npm curl -sL https://deb.nodesource.com/setup_6.x | sudo -E bash - sudo apt-get install -y nodejs sudo apt-get install npm npm install Now I have

How to convert from kml to GeoJson with python3

To do it, you can import ogr from osgeo from osgeo import ogr def kml2geojson(kml_file):     drv = ogr.GetDriverByName('KML')     kml_ds = drv.Open(kml_file)     for kml_lyr in kml_ds:         for feat in kml_lyr:             print feat.ExportToJson() kml2geojson('/path/to/your.kml') But, if you try to run it, maybe you will see the following error: ImportError: No module named 'osgeo' This means that you need gdal libraries. If you try to install it with pip3 you will see the following: pip3 install gdal ... cc1plus: warning: command line option ‘-Wstrict-prototypes’ is valid for C/ObjC but not for C++     extensions/gdal_wrap.cpp:3168:22: fatal error: cpl_port.h: No such file or directory     compilation terminated.     error: command 'x86_64-linux-gnu-gcc' failed with exit status 1 We search which pakage includes cpl_port.h: apt-file search cpl_port.h    libgdal-dev: /usr/include/gdal/cpl_port.h After install python3-gda

How to run pykml in python3

First, you need to install pykml for python3: sudo pip3 install pykml Now, if you try to read a kml file you will get the following message: Python 3.6.3 (default, Oct  3 2017, 21:45:48)  [GCC 7.2.0] on linux Type "help", "copyright", "credits" or "license" for more information. >>> from pykml import parser Traceback (most recent call last):   File "<stdin>", line 1, in <module>   File "/usr/local/lib/python3.6/dist-packages/pykml/parser.py", line 8, in <module>     import urllib2 ModuleNotFoundError: No module named 'urllib2' To solve it, you need to fix urllib2 to work well in python3 If you try to install it with pip3 you will get:                                                               Collecting urllib2   Could not find a version that satisfies the requirement urllib2 (from versions: ) No matching distribution found for urllib2 To solve it, you must edit /us

Plugin para Tampermonkey para hacer seguimiento de tus productos de Aliexpress en Correos de Chile

Image
Como sabrĆ”n, el nĆŗmero de seguimiento que entrega Aliexpress para seguir los productos no es el mismo que requiere Correos de Chile. Primero hay que destactar que este plugin que desarrollĆ© es sĆ³lo compatible con los envĆ­os con los que Correos de Chile tiene convenio (por lo general todos los que dan un plazo de entrega entre 20 y 31 dĆ­as). es el plazo de entrega del servicio contratado por el remitente. Si deseas un despacho en menor tiempo, debes solicitar que te envĆ­en vĆ­a EMS, PPI Certificado o Encomienda Internacional. Saludos. — correoschile (@correoschile) March 7, 2018 La mayorĆ­a de los envĆ­os tienen un plazo superior a los 30 dĆ­as (entre 30 y 60, incluso hasta 90 dƬas), los que corresponden a servicios bĆ”sicos, los cuales NO poseen seguimiento en Chile, independiente de que Aliexpress indique un nĆŗmero de seguimiento. respondimos reciĆ©n un inbox tuyo de FB y los cĆ³digos indicados corresponden a un servicio bĆ”sico, por lo cual no posee seguimiento en Chile y

Issue with USB, Android does it not recognized and explorer freezes

Image
I have this issue with my Xiaomi A1 with Android Oreo If you try access to your USB OTG and when you plug it and click OK on this pop-up window: Maybe your app will freeze and you couldn't access to your USB, like that I tried with es explorer non-pro version and it got this info (the app freeze also): To solve it, just choose Cancel instead of OK when you insert your USB. Wait until the USB starts to blink (around 25 seconds) and try to access to it again. Enjoy it!

How to fix Android when developer options are not available for this user

Image
I have an Android One with Oreo version and suddenly my Android rebooted and after that it started to behave strangely: 1) Notification section doesn't work. I can't see notifications from my apps and the arrow and the screw icon to settings access don't work. 2) As I can't access to the notification area, I can't enable Use USB to Transfer Files to access to my phone memory. 3) I can't access to developer mode (I before active it with a lot of taps over Build number). Clicking on developer options just shows developer options are not available to this user. 4) I can't update or install the apps on google play. They freeze on Download pending... message 5) Home and Switch buttons don't work. They light up and vibrate when I tap them but they do nothing. This issue is apparently related to a deconfiguration of user accounts. To fix it, you need re-setup the users. As you can't access to the user manager (you are in guest mode