Posts

[SOLVED] E: Problem executing scripts APT::Update::Post-Invoke

If you have a legacy docker version and you try to update you repositories with apt update, probably you will get the following error: E: Problem executing scripts APT::Update::Post-Invoke 'rm -f /var/cache/apt/archives/*.deb /var/cache/apt/archives/partial/*.deb /var/cache/apt/*.bin || true' E: Sub-process returned an error code To solve it, you must install a version higher than 20.10.9. If you haven't this version in you apt repositories, you can install it throught snap. To check your docker version just write this command: docker -v  Enjoy it!
[Solved] Issue to run Julia from snap: symbol lookup error: /snap/core18/current/lib/x86_64-linux-gnu/libpthread.so.0: undefined symbol: __libc_vfork, version GLIBC_PRIVATE

If you installed Julia from snap, and tried to run it from Python3, probably you get the following issue. from julia.api import Julia jl = Julia(compiled_modules=False) Traceback (most recent call last):   File "<stdin>", line 1, in <module>   File "/usr/local/lib/python3.10/dist-packages/julia/core.py", line 472, in __init__     self.api = LibJulia.from_juliainfo(jlinfo)   File "/usr/local/lib/python3.10/dist-packages/julia/libjulia.py", line 203, in from_juliainfo     return cls(   File "/usr/local/lib/python3.10/dist-packages/julia/libjulia.py", line 226, in __init__     self.libjulia = ctypes.PyDLL(libjulia_path, ctypes.RTLD_GLOBAL)   File "/usr/lib/python3.10/ctypes/__init__.py", line 374, in __init__     self._handle = _dlopen(self._name, mode) OSError: /snap/core18/current/lib/x86_64-linux-gnu/libpthread.so.0: undefined symbol: __libc_vfork, version GLIBC_PRIVATE Appears to be a core...

[Solved] Interface *mon is too long for linux so it will be renamed to the old style (wlan#) name.

If you tried to start monitor mode in a wireless interface, probably you will see the following message: Interface wlx6466b31e7738mon is too long for linux so it will be renamed to the old style (wlan#) name.  , where 6466b31e7738 is the MAC address from your interface.  Just write the following commands in your terminal: sudo ifconfig wlx6466b31e7737 down sudo ip link set wlx6466b31e7737 name wlan0 sudo ifconfig wlan0 up , where wlx6466b31e7737 is your wireless interface. Now, you could start monitor mode in your interface as follows: sudo airmon-ng start wlan0 Found 4 processes that could cause trouble. Kill them using 'airmon-ng check kill' before putting the card in monitor mode, they will interfere by changing channels and sometimes putting the interface back in managed mode     PID Name    1382 avahi-daemon    1388 NetworkManager    1424 wpa_supplicant    1427 avahi-daemon PHY    Interface  ...

Javascript for LibreOffice scripting

Image
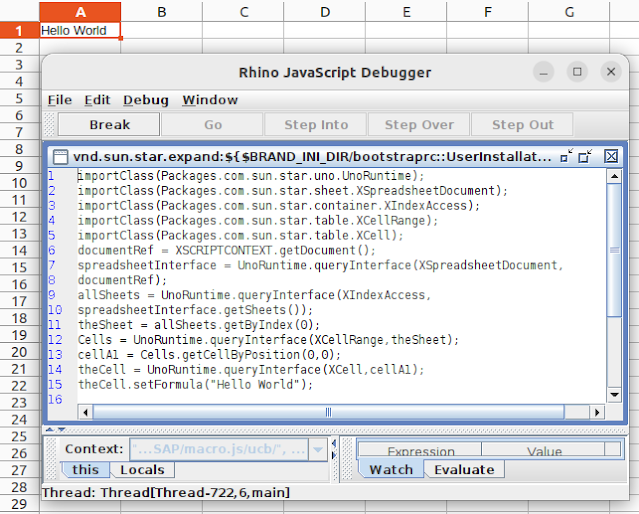
Now, a js example to run in OO Calc: importClass(Packages.com.sun.star.uno.UnoRuntime); importClass(Packages.com.sun.star.sheet.XSpreadsheetDocument); importClass(Packages.com.sun.star.container.XIndexAccess); importClass(Packages.com.sun.star.table.XCellRange); importClass(Packages.com.sun.star.table.XCell); documentRef = XSCRIPTCONTEXT.getDocument(); spreadsheetInterface = UnoRuntime.queryInterface(XSpreadsheetDocument, documentRef); allSheets = UnoRuntime.queryInterface(XIndexAccess, spreadsheetInterface.getSheets()); theSheet = allSheets.getByIndex(0); Cells = UnoRuntime.queryInterface(XCellRange,theSheet); cellA1 = Cells.getCellByPosition(0,0); theCell = UnoRuntime.queryInterface(XCell,cellA1); theCell.setFormula("Hello World"); // https://wiki.documentfoundation.org/images/f/f0/CG6212-CalcMacros.pdf   And here the result:  

VisualBasic scripting in LibreOffice

Image
 Here an example to run in Writer: Sub Hello Dim oDoc Dim sTextService$ Dim oCurs REM ThisComponent se refiere al documento actualmente activo oDoc = ThisComponent REM Verifica que este es un documento de texto sTextService = "com.sun.star.text.TextDocument" If NOT oDoc.supportsService(sTextService) Then MsgBox "This macro only works with a text document" Exit Sub End If REM obtiene la vista del cursor del controlador actual oCurs = oDoc.currentController.getViewCursor() REM Mueve el cursor al final del documento oCurs.gotoEnd(False) REM Inserta el texto “Hola” al final del documento oCurs.Text.insertString(oCurs, "Hello World", False) End Sub REM https://documentation.libreoffice.org/assets/Uploads/Documentation/es/GS52/PDF/GS5213-PrimerosPasosConMacros.pdf And the result is here:

BeanShell scripting in LibreOffice

Image
Here is a BeanShell script to xploit functionalities from LibreOffice spreadsheeat: import com.sun.star.uno.UnoRuntime; import com.sun.star.sheet.XSpreadsheetView; import com.sun.star.text.XText; import com.sun.star.sheet.XCellRangeData; // // Get active spreadsheet // model = XSCRIPTCONTEXT.getDocument(); controller = model.getCurrentController(); view = UnoRuntime.queryInterface(XSpreadsheetView.class, controller); sheet = view.getActiveSheet(); // // Create a TEXT CELL // // Get cell by position cell = sheet.getCellByPosition(0, 0); // Access the cell text cellText = UnoRuntime.queryInterface(XText.class, cell); // Get the text cursor of the cell text textCursor = cellText.createTextCursor(); // Insert a string in the cell through the text cursor and overwrite the cell content // Using 'false' as third parameter adds the inserted string cellText.insertString(textCursor, "BeanShell macro example", true); // // Access and modify VALUE CELLS // // Get cell by position...

[Solved] Key is stored in legacy trusted.gpg keyring (/etc/apt/trusted.gpg), see the DEPRECATION section in apt-key(8) for details.

 If you run apt update, you probably will see the following message: [Solved] Key is stored in legacy trusted.gpg keyring (/etc/apt/trusted.gpg), see the DEPRECATION section in apt-key(8) for details. To solve it, you need to export the GPG key from the deprecated keyring and store it in /usr/share/keyrings. To do it, just get the last 4 bytes from the fingerprint and export the key to /usr/share/keyrings folder: sudo apt-key list Warning: apt-key is deprecated. Manage keyring files in trusted.gpg.d instead (see apt-key(8)). /etc/apt/trusted.gpg -------------------- pub   rsa4096 2018-08-14 [SC]       E869 7E2E EF76 C02D 3A63  3277 8881 B2A8 2109 76F2 uid           [ unknown] Package Manager (Package Signing Key) <packages@pgadmin.org> sub   rsa4096 2018-08-14 [E]  sudo apt-key export 210976F2 | sudo gpg --dearmour -o /usr/share/keyrings/pgadmin4.gpg   Now, you need ...

[Solved] Install scapy on Ubuntu 22.04

 If you try to install scapy from apt, you will see the following issues: sudo apt install python3-scapy sudo scapy <frozen importlib._bootstrap>:914: ImportWarning: _SixMetaPathImporter.find_spec() not found; falling back to find_module() <frozen importlib._bootstrap>:671: ImportWarning: _SixMetaPathImporter.exec_module() not found; falling back to load_module() INFO: Can't import PyX. Won't be able to use psdump() or pdfdump(). To solve them, you need pyx module sudo apt install python3-pyx I could not find info about _SixMetaPathImporter.exec_module()  To avoid this warning, just install the git version: git clone https://github.com/secdev/scapy.git cd scapy sudo python3 setup.py install Enjoy it!

[Solved] Install SAP GUI 7.70 patch level 5 (18/02/2022) Java in Ubuntu 22.04

Image
 First, you need to install the dependencies: apt-get update sudo bash apt-get install -y --no-install-recommends wget ca-certificates gnupg2 export GNUPGHOME="$(mktemp -d)" wget -q -O - https://dist.sapmachine.io/debian/sapmachine.old.key | gpg --batch --import gpg --batch --export --armor 'DA4C 00C1 BDB1 3763 8608 4E20 C7EB 4578 740A EEA2' > /etc/apt/trusted.gpg.d/sapmachine.old.gpg.asc wget -q -O - https://dist.sapmachine.io/debian/sapmachine.key | gpg --batch --import gpg --batch --export --armor 'CACB 9FE0 9150 307D 1D22 D829 6275 4C3B 3ABC FE23' > /etc/apt/trusted.gpg.d/sapmachine.gpg.asc gpgconf --kill all && rm -rf "$GNUPGHOME" echo "deb http://dist.sapmachine.io/debian/amd64/ ./" > /etc/apt/sources.list.d/sapmachine.list apt-get update apt-get install sapmachine-18-jdk openjfx Next, download SAP GUI 7.70 from mediafire Execute the jar file with the following sentence: sudo java -jar PlatinGUI770_5-80004696.JAR Next...

[Solved] How to install VMPlayer on Ubuntu 22.04

Image
First, download it from the official url Now, change the permissions to execute it: chmod +x VMware-Player-Full-16.2.3-19376536.x86_64.bundle sudo ./VMware-Player-Full-16.2.3-19376536.x86_64.bundle Now, you need to run VMPlayer, but you probably see the following issue:       To install all modules in newer kernels, just install  this package: wget https://codeload.github.com/mkubecek/vmware-host-modules/tar.gz/refs/heads/workstation-16.2.1 -O workstation-16.2.1.tar.gz tar xvf workstation-16.2.1.tar.gz cd vmware-host-modules-workstation-16.2.1/ make sudo make install   If you try to run an image, you could see the following alert: This means you need to load the vmmon and vmnet modules to the kernel: sudo modprobe vmmon sudo modprobe vmnet   Now, you could run VMPlayer without issues!  

ImageMagick cache resources exhausted

If you are trying to merge multiple images in a pdf you can use "convert" command, and probably will see the following message: convert-im6.q16: attempt to perform an operation not allowed by the security policy `PDF' @ error/constitute.c/IsCoderAuthorized/408. to enable this operation, you must edit the policy.xml file from ImageMagick. This file is located in /etc/ImageMagick-6/policy.xml (if the path doesn't exist, just write /etc/ImageMagick and press Tab). Add the following line before </policymap> <policy domain="coder" rights="read | write" pattern="PDF" /> Also, other common issue is the following: convert-im6.q16: DistributedPixelCache '127.0.0.1' @ error/distribute-cache.c/ConnectPixelCacheServer/244. convert-im6.q16: cache resources exhausted `source.jpg' @ error/cache.c/OpenPixelCache/3984. To solve this, just increase the cache resources in disk value. Replace: <policy domain="resource" na...

failed to dial gRPC: cannot connect to the Docker daemon. Is 'docker daemon' running on this host?: dial unix /var/run/docker.sock: connect: permission denied

To fix this issue you only need to change the permissions to docker.sock sudo chmod 666 /var/run/docker.sock Enjoy it!

How to fix TeamViewer: Not ready. Please check your connection

Image
If you run TeamViewer you will see the following output Init... CheckCPU: SSE2 support: yes Checking setup... Launching TeamViewer ... Starting network process (no daemon) Network process already started (or error) Launching TeamViewer GUI ... If you have an eternal loading, you will see the following window: To solve it, and could to connect to a remote computer you must run teamviewer as daemon as follows: sudo teamviewer --daemon enable Action: Installing daemon (15.5.3) for 'systemd' ... installing /etc/systemd/system/teamviewerd.service (/opt/teamviewer/tv_bin/script/teamviewerd.service) Try: systemctl enable teamviewerd.service systemctl start teamviewerd.service Now, execute again teamviewer as follows: teamviewer                     Init... CheckCPU: SSE2 support: yes Checking setup... Launching TeamViewer ... Launching TeamViewer GUI ... Enjoy it!

Microsoft Teams meeting link on linux doesn't work

If you must use Teams in linux, probably you will have this issue. After click the meeting link, Teams opens, but not the meeting. To solve it, you need fix the sentence to execute Teams.  Edit the /usr/bin/teams file and replace: nohup "$TEAMS_PATH" --disable-namespace-sandbox --disable-setuid-sandbox "$@" > "$TEAMS_LOGS/teams-startup.log" 2>&1 & by nohup "$TEAMS_PATH" "$@" --disable-namespace-sandbox --disable-setuid-sandbox > "$TEAMS_LOGS/teams-startup.log" 2>&1 & As you can see, the difference is only the position of "$@" Enjoy it!

How to enable Postgres debugging

Image
 It's very simple. Just install the plugin with the following sentence: sudo apt install postgresql-12-pldebugger Next, edit /etc/postgresql/12/main/postgresql.conf and enable the plugin adding the following line: shared_preload_libraries = 'plugin_debugger' Now, you need to restart the postgres service sudo service postgres restart If you run PGAdmin4, now you can see the extension enabled Enjoy it!

Firefox 85 doesn't load sign in page

Image
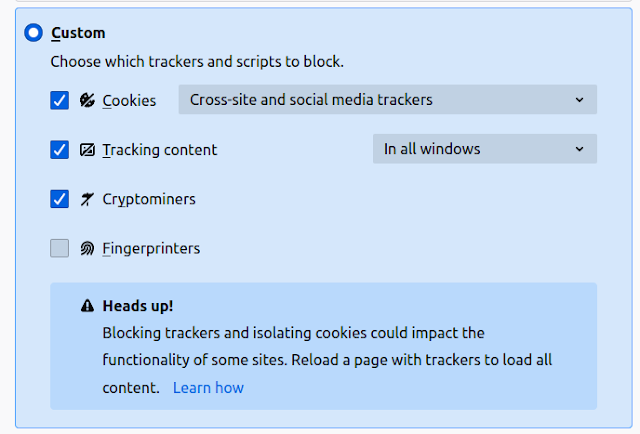
I just format my pc and I installed firefox 85.0. When I tried to sign in to accounts.firefox.com the page doesn't load. I found the solution is to disable privacy.resistFingerprinting You can do it from Preferences/Privacy & Security         Just uncheck Fingerprinters checkbox Enjoy it!

HINT: No function matches the given name and argument types. You might need to add explicit type casts.

It is common when using different versions of PostgreSQL, the name of the functions can change their name. In my particular case, migrating from version 9 to 12, the error appears with the following function LINE 10: select ST_Line_Interpolate_Point(geom,distance) as ge...                     ^ HINT: No function matches the given name and argument types. You might need to add explicit type casts. Just change the function name ST_Line_Interpolate_Point to: ST_LineInterpolatePoint Enjoy!

How to install snort 3.1 in Ubuntu 20.10

Image
 In my last post I installed snort3 in Ubuntu 18.04. Now, I tried in Ubuntu 20.10 and I find more issues to fight. When I was compiling I got an Error 2. It is not very intuitive to know what the error is due to. I compiled it again and I catched. Is a libdaq error, associated to a lower version. Now, we proceed to install the last github version of libdaq: git clone https://github.com/snort3/libdaq.git ./bootstrap ./configure make sudo make install Now, we compile again snort, but... make[2]: *** No rule to make target '/usr/lib/x86_64-linux-gnu/libdaq.so', needed by 'src/snort'.  Stop. make[2]: Leaving directory '/tmp/snort3-3.1.0.0/build' make[1]: *** [CMakeFiles/Makefile2:2997: src/CMakeFiles/snort.dir/all] Error 2 make[1]: Leaving directory '/tmp/snort3-3.1.0.0/build' make: *** [Makefile:152: all] Error 2 As you see, snort is looking for libdaq.so in /usr/lib/x86_64-linux-gnu. Now, we look for libdaq.so path with locate libdaq.so /usr/local/lib/lib...

How to install snort3 from github

First, you must clone the repository: git clone https://github.com/snort3/snort3.git cd snort3 Now, install snort2 dependencies and some dependencies that snort2 does not use: sudo apt build-dep snort sudo apt install libhwloc-dev libluajit-5.1-dev libunwind-dev  Now, procced to compile the project: ./configure_cmake.sh cd build make Probably you will see the following issue: daq_dlt.h: No such file or directory This happend, because you need a newer labdaq version (the version installed as dependence from snort is older). git clone https://github.com/snort3/libdaq.git cd libdaq ./bootstrap ./configure make sudo make install Now, come back to snort3 folder and try to compile it again. Probably you will see this issue: undefined reference to daq_version_string' This appears because two versions of daq are installed (repository and github version).  To solve it, like is reported here  just remove the older version: apt remove libdaq-dev Now execute the following: /usr/local...

Enable google drive syncronized folder in ubuntu iwth Ocamlfuse

 The best option is to install ocamlfuse. To do it just follow this steps: $ sudo add-apt-repository ppa:alessandro-strada/ppa $ sudo apt-get update $ sudo apt-get install google-drive-ocamlfuse # google-drive-ocamlfuse mkdir ~/google-drive $ google-drive-ocamlfuse ~/google-drive df -h More information in this link