Posts

Showing posts from 2017

How to connect a bluetooth speaker to your Raspberry Pi 3 without GUI

First, you need to download all necesary applications: sudo apt-get update && sudo apt-get install bluez pulseaudio-module-bluetooth python-gobject python-gobject-2 bluez-tools udev Now, add our user (pi) to the Pulse audio group so we the user can play audio through it. sudo usermod –a –G lp pi Now, we need enable A2DP in our bluetooth configuration file /etc/bluetooth/audio.conf the following sentences: [General]: Enable=Source,Sink,Media,Socket The next step is modify the Pulse daemon resampling method in  /etc/pulse/daemon.conf adding a new line after ;resample-method with the following info: resample-method = trivial To automate the bluetooth source to audio sink, we need to add a new configuration to udev init.d editing file /etc/udev/rules.d/99-input.rules and add this to the file: SUBSYSTEM="input", GROUP="input", MODE="0660" KERNEL=="input[0-9]*", RUN+="/usr/lib/udev/bluetooth" Now, create a ne

How to stream rtsp videos or mp4 files throught python/flask + opencv

Image
First, you need to download the code to generate your site with flask. To do this, you can use the following @miguelgrinberg project to stream your webcam or image files with flask. git clone https://github.com/miguelgrinberg/flask-video-streaming In app.py you need replace: from camera import Camera by from camera_opencv import Camera Now, you must edit your video source from camera_opencv.py. video_source = 0 , means that you want to stream your webcam (/dev/video0) You can edit it, by a file or a rstp url If you replace 0 by 'video.mp4' you will probably get the following error: Starting camera thread. Exception in thread Thread-4: Traceback (most recent call last): File "/usr/lib/python3.5/threading.py", line 914, in _bootstrap_inner self.run() File "/usr/lib/python3.5/threading.py", line 862, in run self._target(*self._args, **self._kwargs) File "/home/nboettcher/Downloads/rtsp/flask-video-streaming/base_camera.py", line 93, i

How to install Matlab from iso files in Ubuntu Linux

Image
If you try mount the iso files, maybe you can't change the permissions to execute (read-only files). Try to extract both isos with: 7z x namefileDVD1.iso 7z x namefileDVD2.iso To run matlab installer you must change the permissions from two files: chmod +x install chmod +x bin/glnxa64/install_unix If you execute "sudo ./install" probably you will get this message: Preparing installation files ... Installing ... Finished. That means that you may have problem with your jre environment. Give the JRE path to the executable to run it: sudo ./install -javadir "/usr/lib/jvm/java-8-openjdk-amd64/jre"  If you don't know where is your JRE path, just find jre folders with: locate jre Enjoy it!

How to install Freeplane 1.6.x from github in Ubuntu 16.04

First, you need to clone the project form github: git clone https://github.com/freeplane/freeplane.git Now, to build it, you need to install grandle to create BIN folder where will be freeplane: sudo apt-get install gradle cd freeplane gradle dist test cd BIN ./freeplane.sh Enjoy it!

How to configure a Matlab cluster in your lan

Image
First, you need to run admincenter to mange your cluster. It route should be there: /usr/local/MATLAB/R2016a/toolbox/distcomp/bin/admincenter Now, you must run mdce on each member node of your cluster cd /usr/local/MATLAB/R2016a/toolbox/distcomp/bin sudo ./mdce start                 WARNING: The mdce script detected that the number of processes allowed is limited by ulimit. Be sure that the limit of processes for the ROOT user (or the user running the mdce service) is set to either "unlimited" or at least 128 * W, where W is the maximum number of MATLAB Distributed Computing Server workers that will run on this machine. Creating LOGBASE directory (/var/log/mdce). Creating CHECKPOINTBASE directory (/var/lib/mdce). Creating SECURITY_DIR directory (/var/lib/mdce/security). Starting the MATLAB Distributed Computing Server in the background. To choice who is the jobmanger or workers you need run each command by separate: sudo ./startjobmanager or sudo ./sta

IOError: [Errno 13] Permission denied: '/usr/local/lib/python2.7/dist-packages/protobuf-3.2.0-py2.7.egg/EGG-INFO/namespace_packages.txt'

If you try to execute a python script and you get this error: File "~/.local/lib/python2.7/site-packages/pkg_resources/__init__.py", line 3017, in <module>     @_call_aside   File "~/.local/lib/python2.7/site-packages/pkg_resources/__init__.py", line 3003, in _call_aside     f(*args, **kwargs)   File "~/.local/lib/python2.7/site-packages/pkg_resources/__init__.py", line 3045, in _initialize_master_working_set     dist.activate(replace=False)   File "~/.local/lib/python2.7/site-packages/pkg_resources/__init__.py", line 2575, in activate     for pkg in self._get_metadata('namespace_packages.txt'):   File "~/.local/lib/python2.7/site-packages/pkg_resources/__init__.py", line 2565, in _get_metadata     for line in self.get_metadata_lines(name):   File "~/.local/lib/python2.7/site-packages/pkg_resources/__init__.py", line 1471, in get_metadata_lines     return yield_lines(self.get_metadata(name))   File

How to install wine on Ubuntu 16.04 64 bits

If you try to install wine, maybe you will see the following error: The following packages have unmet dependencies:  wine1.6 : Depends: wine1.6-i386 (= 1:1.6.2-0ubuntu14)            Recommends: fonts-droid but it is not installable E: Unable to correct problems, you have held broken packages. I tried installing these fonts but without solution. To avoid it, you can download the source code and compile it: wget https://dl.winehq.org/wine/source/2.0/wine-2.0.tar.bz2 tar xjvf wine-2.0.tar.bz2 cd wine2.0 ./configure checking whether gcc -m32 works... no configure: error: Cannot build a 32-bit program, you need to install 32-bit development libraries. This happend because you must be explicit if you want to install on a 64-bits platform. ./configure --enable-win64 make -j8 sudo make install Enjoy it!

How to broke the pdf security to edit it

 If you think the protection of pdf is enough for nobody can edit it, you are wrong. Just execute the follow sentence to broke it: sudo apt-get install qpdf qpdf --decrypt encrypted.pdf decrypted.pdf Enjoy it!

How to install a WhatsApp bot based on Python

First, we need to download the yowsup code: git clone https://github.com/tgalal/yowsup.git cd yowsup sudo python setup.py install python yowsup-cli registration -p 569xxxxxxxx -C 56 -r sms Where 56 is the country code (Chile in my case) You will receive a code in your phone to register the account python yowsup-cli registration -p 569xxxxxxxx -C 56 --register 201-124 Now, create a file called mydetails with the following information and the password that yowsup-cli prints: cc=56 phone=569xxxxxxxx password=PUT_THE_PASSWORD_HERE To send a whatsapp message, you only need write the following sentence: yowsup-cli demos -c mydetails -s 569xxxxxxxx "hello world" If you prefer the CLI, you need to do the following: yowsup-cli demos --yowsup --config mydetails  /L /message send 569xxxxxxxx "hello world" Enjoy it!

Install Netflix in RK3188 without google play

Image
To access to any android application, you can use apk-dl.com to get the apk file and install it without google play. In my case I have a CYX_809III_RK3188, is a HDMI Stick for your TV and runs Android 4.4.2 If you try install on it the last Netflix version, you will see this message: There is a problem parsing the package To avoid it, you need to found a Netflix version compatible with your device. I used  http://www.apkmirror.com/apk/netflix-inc/netflix/  to search every versions of Netflix. In my case, the last version that works on my device is Netflix 3.11 Enjoy it!

How to upgrade networkx to developer version in Linux

Weight functions are only available on networkx development version. To install it you need to do the following: git clone https://github.com/networkx/networkx.git cd networkx sudo python setup.py install nosetest ERROR: Failure: ImportError (No module named coverage) ImportError: No module named pandas To fix it, install these libraries and re-run nesetest: sudo pip install pandas coverage nosetests ---------------------------------------------------------------------- Ran 3045 tests in 33.191s OK (SKIP=7) If you run your python console you can ask for networkx version as follows: python                 Python 2.7.12 (default, Nov 19 2016, 06:48:10)  [GCC 5.4.0 20160609] on linux2 Type "help", "copyright", "credits" or "license" for more information. >>> import networkx >>> print networkx.__version__ 2.0.dev_20170321173742 But, if you run your code it still be using version 1.1 Now you need t

How to connect a2dp bluetooth headset on Ubuntu 16.04

The bluetooth stereo headset on Ubuntu has been in trouble for some time. To solve it, I have read different techniques but in several you have to edit and configure files. I found a quick and easy way to connect and enable the a2dp function (stereo) on your headset with just execute one file. You can download it from the github project or directly: https://gist.github.com/pylover/d68be364adac5f946887b85e6ed6e7ae or wget  https://gist.githubusercontent.com/pylover/d68be364adac5f946887b85e6ed6e7ae/raw/763ef4ef7245665b55024a3a76794808c3b6a322/a2dp.py Just execute it with python3 and select your mac address device that you want to connect. If you use pavucontrol, you can see on configuration tab, that your device appears with a High Fidelity Playback (A2DP Sink) profile. Enjoy it!

npm ERR! Failed at the node-sass@3.13.1 postinstall script 'node scripts/build.js'.

Deal with npm is a big headache. I have npm 3.53 and node 8.0.0-pre Today I has been fighting with run npm install and I had this error: npm WARN optional SKIPPING OPTIONAL DEPENDENCY: fsevents@^1.0.0 (node_modules/chokidar/node_modules/fsevents): npm WARN notsup SKIPPING OPTIONAL DEPENDENCY: Unsupported platform for fsevents@1.1.1: wanted {"os":"darwin","arch":"any"} (current: {"os":"linux","arch":"x64"}) npm WARN You are using a pre-release version of node and things may not work as expected npm WARN optional SKIPPING OPTIONAL DEPENDENCY: iltorb@1.0.13 (node_modules/iltorb): npm WARN optional SKIPPING OPTIONAL DEPENDENCY: iltorb@1.0.13 install: `node-gyp rebuild` npm WARN optional SKIPPING OPTIONAL DEPENDENCY: Exit status 1 npm ERR! code ELIFECYCLE npm ERR! errno 1 npm ERR! node-sass@3.13.1 postinstall: `node scripts/build.js` npm ERR! Exit status 1 npm ERR!  npm ERR! Failed at the node-sa

multicast join failed: No such device

If you try to generate multicast traffic with iperf, this message could probably appear, especially if you are using mininet: multicast join failed: No such device  To solve it, you need to create an entry in the route table for multicast traffic like this: ip route add 224.0.0.0/4 dev eth0 On the server side use: iperf -s -u -B 225.0.0.5 -i 1 On the client side use: iperf -c 225.0.0.5 -i -i 1 -l 100 -b 1k Enjoy it!

fatal: Unable to find remote helper for 'https'

A common issue with git is when you try clone a project (nodejs in my case) appears this error: git clone https://github.com/nodejs/node.git Cloning into 'node'... fatal: Unable to find remote helper for 'https' I was reading different solutions, like replace https by git, but the errors is still here: git clone git://github.com/nodejs/node.git Cloning into 'node'... fatal: unable to connect to github.com: github.com[0: 192.30.253.113]: errno=Connection timed out Other recurrent solution is to install openssl libraries for curl (to read https protocol): sudo apt-get install libcurl4-openssl-dev Now, you must install git again: wget https://www.kernel.org/pub/software/scm/git/git-2.12.0.tar.gz tar xvf git-2.12.0.tar.gz cd git-2.12.0  ./configure make -j8 sudo make install Enjoy it!

How to install go 1.8 on Ubuntu 16.04

If install golang in Ubuntu 16.04 throught synaptic, you will install version 1.6 and maybe you will see the following problems: cannot find package "golang.org/x/sync/errgroup" in any of: /usr/lib/go-1.6/src/golang.org/x/sync/errgroup (from $GOROOT) /src/golang.org/x/sync/errgroup (from $GOPATH) exit status 1 exit status 1 To avoid it, is better install it from the source: wget https://storage.googleapis.com/golang/go1.8.linux-amd64.tar.gz sudo tar -zxvf go1.8.linux-amd64.tar.gz -C /usr/local/ mkdir ~/go echo 'export GOROOT=/usr/local/go' >> ~/.bashrc echo 'export GOPATH=$HOME/go' >> ~/.bashrc echo 'export PATH=$PATH:$GOROOT/bin:$GOPATH/bin' >> ~/.bashrc source ~/.bashrc Enjoy it!

How to get the difference between the last two values in influxdb

Image
If you are measuring traffic, probably your are writting OVS data as accumulative bytes. This is an extract of my influxdb data You can get the newest two values with the following sentence: influx -execute "SELECT value FROM packets_in WHERE dp_name='s3' AND port_name='port1' ORDER BY time DESC LIMIT 2" -database=faucet -precision=rfc3339 name: packets_in time                 value ----                 ----- 2017-03-16T20:00:23Z 326 2017-03-16T20:00:13Z 302 If you want to get the difference between them (326-302), you need the lastest influxdb version ( here a post about how to upgrade your current version). With the DIFFERENCE command, you can do it: influx -execute "SELECT DIFFERENCE(value) * -1 FROM packets_in WHERE dp_name='s3' AND port_name='port1' ORDER BY time DESC LIMIT 1" -database=faucet -precision=rfc3339 name: packets_in time                 difference ----                 ---------- 2017-03-16T2

How to upgrade Influxdb 0.10.0 to 1.2.2 in Ubuntu 16.04

First, you need to remove the old version: sudo apt-get remove influxdb influxdb-client Now, to install the newest version you can do it throught a .deb file or from the repositories: From .deb file: wget https://dl.influxdata.com/influxdb/releases/influxdb_1.2.2_amd64.deb sudo dpkg -i influxdb_1.2.2_amd64.deb From repositories: curl -sL https://repos.influxdata.com/influxdb.key | apt-key add - source /etc/lsb-release echo "deb https://repos.influxdata.com/ubuntu xenial stable" | tee -a /etc/apt/sources.list apt-get update apt-get install influxdb In both cases the following message may appear: Preparing to unpack .../influxdb_1.2.1-1_amd64.deb ... Unpacking influxdb (1.2.1-1) over (0.10.0+dfsg1-1) ... dpkg: error processing archive /var/cache/apt/archives/influxdb_1.2.1-1_amd64.deb (--unpack):  trying to overwrite '/usr/bin/influx', which is also in package influxdb-client 0.10.0+dfsg1-1 dpkg-deb: error: subprocess paste was killed by signal

How to create a Unity icon for Pycharm

Image
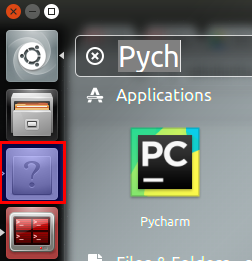
As every aplications, you can create a .desktop file to run it from your Desktop. If you copy this .desktop file in ~/.local/share/applications, you can see it in Unity, but when you run Pycharm the icon that appears doesn't load. To create an icon here, just open Pycharm and create it clicking on Tools > Create Desktop Entry... Now, you could load Pycharm with an Unity icon. Enjoy it!

How to run root python scripts on Pycharm

Image
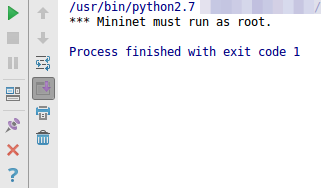
Mininet needs root privileges ti run. If you run a python mininet script on Pycharm you will see the following message: *** Mininet must run as root. To enable root privileges, you need create a new interpreter as follows: sudo visudo -f /etc/sudoers.d/python Add the following information: <user> <host> = (root) NOPASSWD: <full path to python> For example: boettcher boettcher-server = (root) NOPASSWD: /usr/bin/python Create a script called python-sudo.sh, containing (with your correct full python path): #!/bin/bash sudo /usr/bin/python "$@" Be sure to make the script executable: chmod +x python-sudo.sh To change your actual interpreter for this new one, in PyCharm, go to File > Settings > Project Interpreter. Click the gear icon by the current Project Interpreter drop-down, and choose “More…”. Then click the green plus icon to add a new interpreter (Add Local). Browse to python-sudo.sh and select it  and

Automate mininet to run batch commands

If you prefer to use mininet console instead python API, maybe you will need automate the process to run batch commands. With source command you can load a file with all commands to execute inside mininet, like this: source init.cli This is the content of init.cli: py "Configuring network" h1 ifconfig h1-eth0 10.0.1.1/24 h2 ifconfig h2-eth0 10.0.1.2/24 py "Current network:" net dump py "Adding switches to the controller" sh ovs-vsctl set-controller s1 tcp:127.0.0.1:6633 sh ovs-vsctl set-controller s2 tcp:127.0.0.1:6633 Enjoy it!

How to run ping when STP is ready in a mininet topology

If you have a topology like a mesh or any other with redundant links, you must use Spanning tree protocol (STP) to avoid a while. To run STP, you can use a controller app or setup your virtual switches to be compatible with STP. To run as controller: Run a STP controller app. In my case I use Ryu: ryu-manager --ofp-tcp-listen-port=6633 ryu.app.simple_switch_stp_13 To run as virtual switch (OVSSwitch): You can modify your switch from your terminal (outside mininet) as follows: ovs-vsctl set bridge s1 stp-enable=true You can use the same sentence inside a python script like follows: s1 .cmd( 'ovs-vsctl set bridge s1 stp-enable=true' ) Now, to avoid execute ping before STP is ready, you need to see the status port of your switch. You can use the following code to insert in your python script. while (s1.cmdPrint( 'ovs-ofctl show s1 | grep -o FORWARD | head -n1' ) != "FORWARD \r\n " ): time.sleep( 3 ) # Avoid initial too long delay time.slee

How to use proxychains to hide your ip address

If you want hide your ip address to emulate different users, a good option is proxychains. To install it, you need following these steps: sudo apt-get install tor git clone https://github.com/rofl0r/proxychains-ng.git cd proxychains-ng  ./configure make -j4 sudo make install sudo make install-config sudo service tor start You can edit proxychains config file to add more proxies if you want: vim /usr/local/etc/proxychains.conf To validate if it's working, you can check out you ip address throught curl: proxychains4 curl -s 'http://www.baidu.com/s?ie=UTF-8&wd=ip' |grep "IP:" | grep -oE "[0-9\.]*" [proxychains] config file found: /usr/local/etc/proxychains.conf [proxychains] preloading /usr/local/lib/libproxychains4.so [proxychains] DLL init: proxychains-ng 4.12 [proxychains] Strict chain  ...  127.0.0.1:9050  ...  www.baidu.com:80  ...  OK 62.210.245.158 Enjoy it!

Full faucet.yaml file configuration

version: 2 dps:     test-faucet-1:         dp_id: 0x0000000000000001   # The id of the datapath to be controlled         description: "Initial Test Faucet"    # Purely informational         hardware: "Open_vSwitch"  # used to determine which valve implementation to use         interfaces:             1:                 native_vlan: 100                 name: "port1"   # name for this port, used for logging/monitoring                 acl_in: 1                 description: "Port 1"    # informational             2:                 #native_vlan: 100                 tagged_vlans: [100,2001,2002,2003]                 name: "port2"                 acl_in: 1                 description: "Port 2" vlans:     100:         description: "Test vlan" # informational         name: "test_vlan"  # used for logging/monitoring         max_hosts: 3 # Maxium of 3 hosts can go on this VLAN     2001:      

Issues to run faucet.py

A typicall issue when you run faucet.py is the following: sudo ryu-manager --ofp-tcp-listen-port=6633 /home/nboettcher/Downloads/faucet/src/ryu_faucet/org/onfsdn/faucet/faucet.py ryu.app.simple_switch_13 ryu.app.ofctl_rest ... in __init__  self.config_file, self.logname) TypeError: 'NoneType' object is not iterable To see the specific conflictive line in your config file (faucet.yaml), you need to check out the faucet log: $ cat /var/log/ryu/faucet/faucet.log faucet.config ERROR    Error in file /etc/ryu/faucet/faucet.yaml (while scanning for the next token found character '\t' that cannot start any token   in "/etc/ryu/faucet/faucet.yaml", line 15, column 1) As you can see, yaml files can't use tabulation to ident the content. Replace tabs by spaces. Don't forget delete empty lines at the end of file. Enjoy it!

Do you have problems with Aliexpress sign in?

Image
A common issue in Chrome (I don't know if it happends on Firefox or other browser), is that Aliexpress cookies has problems when you want to access to your account. When you press Access now, the page reloads, but the identification section doesn't shows your name. To fix it, a solution is clear all cookies, but you can delete only ali* cookies as follows: Go to  chrome://settings/ Filter by ali and click on Remove all shown. Now you can login again without problems Enjoy it!

How to geolocate a Wireless IP Camera (P2P) WIFICAM

Image
Yesterday I read about how to access in a remote Wireless IP Camera (P2P) WIFICAM (this is the link https://pierrekim.github.io/blog/2017-03-08-camera-goahead-0day.html ) Fortunately, I had one to test it and validate the bug. This camera has telnet, but I could never find the password. If you try the bug, yo can replace telnet by a bash terminal, using and exploit in C or throught the webpage: Now, when you try access to your camera throught telnet, you will have root access. CĆ”mara Wifi IP P2P permite acceso a telnet sin password gracias a vulnerabilidad en configuraciĆ³n FTP. https://t.co/M7zYcDo3gV pic.twitter.com/h52GLszRTH — NicolĆ”s Boettcher (@nicoboettcher) March 9, 2017 Also, if you exploit this vulnerability in a random camera, you could know where is it in the world, just with the wireless information. With this information, you can search it in Wigle databases to get the latitude and longitude. PyGLE is a wrapper

Contiki 3.0 on XM1000

Image
In other post, I installer contiki 3.x on xm1000. Now, we going to install contiki 3.0 (the lastest version). First, you need to dowload the lastest code from github: git clone https://github.com/contiki-os/contiki.git Now we need to add xm1000 compatibility to our contiki. Thanks to DMI   for the xm1000 patch. Without it, you will see the following error: make: *** No rule to make target 'obj_xm1000/cc2420.o', needed by 'contiki-xm1000.a'.  Stop. I upgrade his patch with an app to access to the xm1000 sensors. Download it from https://drive.google.com/file/d/0B7NXiwmWq7jCb3ROSFZZSWliMnc/view?usp=sharing Now, extract it into contiki folder: tar xzvf xm1000.tar.gz cd xm1000 cp -R * $YOUR_CONTIKI_PATH Go to the apps folder and execute an script that I create to automate the process: cd $YOUR_CONTIKI_PATH/platform/xm1000/apps/sensors ./install.sh Enjoy it!

Running Faucet and Gauge on localhost

Image
In my post about how to configure  mininet-ryu-faucet-gauge-influxdb  I used faucet in a remote machine (as virtual machine). Now, I going to explain how to install and configure it in localhost. First, download it form github: git clone https://github.com/onfsdn/faucet.git cd faucet sudo python setup.py install Probably, you will see this message: build/temp.linux-x86_64-2.7/check_libyaml.c:2:18: fatal error: yaml.h: No such file or directory To avoid it, you need to install yaml: apt-get install libyaml-dev If you try to install it again you will see this message: ERROR:root:Error parsing Traceback (most recent call last):   File "/usr/local/lib/python2.7/dist-packages/pbr/core.py", line 111, in pbr     attrs = util.cfg_to_args(path, dist.script_args)   File "/usr/local/lib/python2.7/dist-packages/pbr/util.py", line 248, in cfg_to_args     kwargs = setup_cfg_to_setup_kwargs(config, script_args)   File "/usr/local/lib/python2.7/dist-pac